
 We continue providing hints and tips with the goal of helping you take full advantage of Thinfinity® VirtualUI™’s existing possibilities.In the present note we will explain how to manage and customize the homepage of a Thinfinity VirtualUI application.If we take a look at Thinfinity VirtualUI’s installation folder (by default the folder is “C:\Program Files\Thinfinity\VirtualUI\dev\web”) we will find, in the dev/web subfolder, a file labeled app.html. This file (actually, an html page) loads all of VirtualUI’s web-side components so that our application can be controlled from the browser.The file’s default content is the following:
<!DOCTYPE html>
<html>
<head>
   <meta http-equiv="Content-Type" content="text/html; charset=utf-8" />
   <meta http-equiv="X-UA-Compatible" content="IE=edge,chrome=1" />
   <meta name="apple-mobile-web-app-capable" content="yes" />
   <meta name="apple-mobile-web-app-status-bar-style" content="black" />
   <meta name="viewport" content="width=device-width, initial-scale=1.0, maximum-scale=1.0, minimum-scale=1.0, user-scalable=no, target-densityDpi=device-dpi" />
   <title>Thinfinity VirtualUI</title>
   <link rel="apple-touch-icon" href="images/icon.png" />
   <link rel="stylesheet" type="text/css" href="css/splash.css"/>
   <link rel="stylesheet" type="text/css" href="css/thinfinity.virtualui.css" />
   <link rel="stylesheet" type="text/css" href="css/print.dialog.css" />
   <script src="virtualui.sdk.min.js" type="text/javascript"></script>
   <script src="js/splash.js" type="text/javascript"></script>
   <script src="js/app.js" type="text/javascript"></script>
   <script src="https://www.google.com/cloudprint/client/cpgadget.js" type="text/javascript"></script>
</head>
<body style="background-color: #f2f2f2;">
     <div id="virtualui" style="position:absolute;display:none;">
     </div>
</body>
</html>
This page holds the basic content needed for VirtualUI to work, but it is nothing more than the default and basic page. We will now show how we can turn it into something different. This will be a small but very important first step to reach a full web-integration of our application.
Modifying the homepage
Modifying the application’s homepage is quite simple. All we have to do is the following:
The first step would be to create a copy of app.html and rename it to myapp.html.
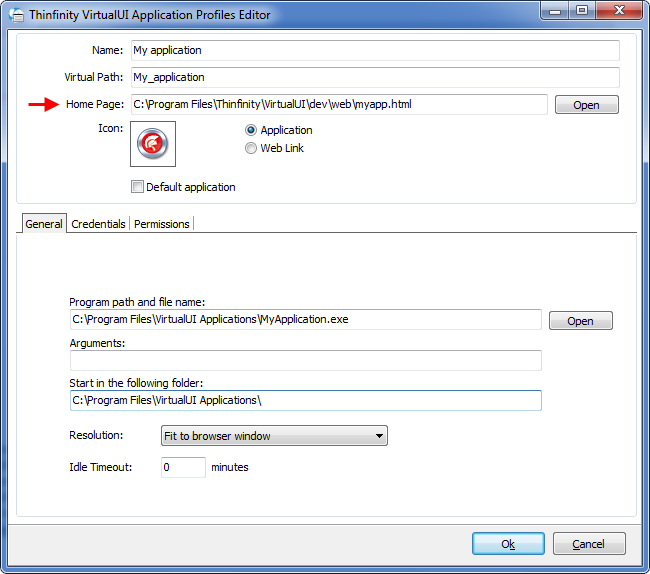
After that, we should open the VirtualUI Server Manager. On the Applications tab we must select the application item, and then open the configuration dialog by clicking on Edit:
We must now set the home page, pointing to the new file, as shown in the image below:
We are now ready to modify the page and to see the changes from the browser. We could certainly change the basic layout of the page: its settings, for example; or select another color, or insert an image in the application background. More importantly, we can change the out of the box event handlers defined in the app.js file:
var virtualUI = null;
var splash = null;
$(document).ready(function () {
   splash = new Splash();
   virtualUI = new Thinfinity.VirtualUI();
   virtualUI.onError = function (errorMsg) {
       splash.show("Application load failed", errorMsg || "", false, false);
   };
   virtualUI.onLoading = function () {
       splash.show(
          (virtualUI.devMode)? "Waiting for application..." : "Loading...",
          "", true, false);
   };
   virtualUI.onShow = function () {
       splash.hide();
   };
   virtualUI.onClose = function (url) {
       // -- The url argument is used to allow to back
       // -- to specific page, when a virtualPath is used
       // -- and url is not null.
       if ((typeof url != 'undefined') && (url != '') && (url != null)) {
           // tries to close the window.top
           if ((virtualUI.devMode != true) || (window.top.opener)) {
               window.top.close();
           }
           window.top.location.href = url;
           return;
       }
       // if in devMode, reload the page
       if (virtualUI.devMode) {
           location.reload();
       }
       // tries to close the window/tab
       if ((virtualUI.devMode != true) || (window.opener)) {
           window.close();
       }
       // else returns to the calling page
       if ((window.top == window) && (document.referrer) && (location.href != document.referrer)) {
           location.href = document.referrer;
       } // else shows the splash
       else {
           splash.show("Application closed", "", false, false);
       }
   };
   // -- Connect to server...
   virtualUI.connect();
});
As we can see, handling the published events of VirtualUI API allows us to control each session step, from the connection to the disconnection. Each .on… event handler can be modified to do what we want. Therefore, we could customize the message, or reshape it to be displayed in a different way, simply by replacing the splash object.
Example: Tailoring the error handling
In the following example we will change the error handling, redirecting the message to a new custom error page:
Create a copy of app.js and rename it to myapp.js.
Modify the link to the app.js file into myapp.html:
<script src="js/myapp.js" type="text/javascript"></script>
Edit the new myapp.js and modify the onError event handler:
var virtualUI = null;
var splash = null;
$(document).ready(function () {
  ...
  ...
  virtualUI.onError = function (errorMsg) {
     location.href = "oops.html?msg=" + encodeURIComponent(errorMsg || "");
  };
  ...
  ...
  // -- Connect to server...
  virtualUI.connect();
});
Finally, create the oops.html with the code below and add it to the web folder:
<!DOCTYPE html>
<html xmlns="http://www.w3.org/1999/xhtml">
<head>
<title>Thinfinity VirtualUI Demo - Oops!</title>
<style>
.errmsg {  width: 100%; height: 100%; text-align: center; }
.errmsg h1 { font-size: 8em; }
.errmsg h2 { font-size: 2em; color: #808080; }
.errmsg h3 { font-size: 1.5em; }
.errmsg h4 { font-size: 1.5em; color: #808080; }
</style>
<script type="text/javascript">
function getmsg() {
  var regexS = "[\\?&]msg=([^&#]*)";
  var regex = new RegExp(regexS);
  var results = regex.exec(window.location.href);
  delete regex;
  document.write((results) ? decodeURIComponent(results[1]) : "Unspecified error");
  document.close();
}
</script>
</head>
<body>
<div class="errmsg">
<h1>Oops!</h1>
<h2>An error occurs when connecting to the application:</h2>
<h3><script>getmsg()</script></h3>
<h4>Sorry, please try again later :(</h4>
</div>
</body>
</html>
This example can be almost trivial, but knowing how to replace or modify the app.html page can help you provide your end users a custom-made experience of your VirtualUI application.