Providing remote access to your internal resources can be a real challenge. If you must deliver an application to potential customers or your contractors need temporary access to corporate desktops, disposable connections can help you provide one-time secure remote access while avoiding complex configuration steps.
If you are responsible for delivering remote access to resources, you know that setting the environment up can turn into a nightmare. The risk increases when granting access to total strangers: unlike simple screen sharing, enabling unattended access to a remote desktop session requires a user definition or assignment.
Client-server applications are expensive and tough to maintain. Working on an entirely new web application alternative becomes unfeasible if your time is limited or your resources are scarce.
Save time and money by webifying your application with Thinfinity VirtualUI in a few easy steps. This tutorial will teach you how to integrate your existing Progress OpenEdge application with Thinfinity VirtualUI, our application virtualization solution that provides instant web access for proprietary software.
Integrate extensive applications, which include several .w/.p programs, by adding one line of code to the main program. Changes applied are inherited by all the programs included in your application’s source code. This simple change enables anywhere access to your application without testing or refactoring.
Keep in mind that VirtualUI manages to achieve this by retaining the exact same behavior as the application’s source code remains unmodified; thus, you can keep running it with the Client Networking application as you are used to.
Learn how to integrate your proprietary OpenEdge application with Thinfinity VirtualUI with the steps listed below:
Progress OpenEdge Applications on Thinfinity VirtualUI
Note: This tutorial applies to OpenEdge applications versions 8,9,10,11,12, and up.
Demo applications
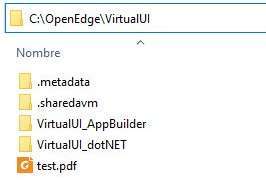
To simplify the demo application to show the integration of the VirtualUI libraries with OpenEdge 4GL, we develop it on C:\OpenEdge\VirtualUI\ using Developer Studio 12.2. VirtualUI_AppBuilder and VirtualUI_dotNET projects, and test.pdf file used on apps, which can be located in that folder:
Both app demos provided show the same basic functionality:
- Define the file dialog usage based on the two available modes: VirtualUI built-in (StdDialogs=false) or using system dialogs (StdDialogs=true).
- Upload files from browser machine to Server. A Server directory can be used as destination; if empty, the application temp directory is used.
- Event handling for OnUploadEnd. The rest of the VirtualUI events can be handled in the same way.
- Download files from Server. In the demos, the user selects a file from a FileOpen dialog browsing the Server file system.
- Preview a PDF file on the browser.
Using VirtualUI on OpenEdge
VirtualUI can be used on OpenEdge applications in two ways:
- Using a COM object.
- Using a .NET class library.
| The Thinfinity VirtualUI .NET class library is a .NET wrapper that allows programmers to natively access its events and methods. Choose each integration method depending on the OpenEdge environment you are using. |
Using a COM object
The project VirtualUI_AppBuilder is an AppBuilder application that uses this method.
The VirtualUI library provides ActiveX classes and interfaces registered on installation. The main class is VirtualUI.
VirtualUI handle is declared in wWin.w code:
DEFINE VARIABLE VirtualUI AS COM-HANDLE NO-UNDO.
This is created and started on the StartVirtualUI function, called as follows:
FUNCTION StartVirtualUI RETURNS LOGICAL:
/* Create VirtualUI instance:*/
CREATE "VirtualUI.VirtualUI" VirtualUI NO-ERROR.
IF NOT ERROR-STATUS:ERROR THEN DO:
/* Start VirtualUI: if installed*/
VirtualUI:Start(30).
/* Enable events:*/
VirtualUI:ENABLE-EVENTS("VirtualUI").
RETURN TRUE.
END.
ELSE
RETURN FALSE.
END.
Also, events are enabled. The parameter is the prefix for procedure handlers: in this case, it is “VirtualUI”, so the event handlers must be declared as “PROCEDURE VirtualUI.EVENTNAME”. The event handler for OnUploadEnd, fired when an upload is finished, is declared in the following form:
PROCEDURE VirtualUI.OnUploadEnd:
DEFINE INPUT PARAMETER fileName AS CHARACTER.
MESSAGE "Uploaded file:" fileName VIEW-AS ALERT-BOX INFORMATION BUTTONS OK TITLE "UploadEnd".
END PROCEDURE.
Using a .NET class library
The project VirtualUI_dotNET is a GUI for .NET application that uses VirtualUI from a class library.
The class library Cybele.Thinfinity.VirtualUI.dll, built from Cybele.Thinfinity.VirtualUI.sln, exposes the VirtualUI SDK for C# (Thinfinity.VirtualUI.cs) provided in VirtualUI Development Environment installation.
Once the class library is added to the project, all classes and interfaces are on Cybele.Thinfinity namespace can be used on applications.
VirtualUI object is declared in the main form (Form1.cls):
DEFINE PRIVATE VARIABLE m_VirtualUI AS CLASS Cybele.Thinfinity.VirtualUI NO-UNDO.
And created and started on StartVirtualUI() method, which is called from the form constructor:
METHOD PRIVATE VOID StartVirtualUI():
/* Create VirtualUI instance:*/
m_VirtualUI = NEW Cybele.Thinfinity.VirtualUI().
/* Start VirtualUI:*/
m_VirtualUI:Start(30).
/* Attach event handlers:*/
m_VirtualUI:OnUploadEnd:Subscribe(THIS-OBJECT:VirtualUI_UploadEnd).
END METHOD.
Also, the event handler for OnUploadEnd is attached. This is fired when an upload is finished.
METHOD PRIVATE VOID VirtualUI_UploadEnd(INPUT sender AS System.Object, INPUT e AS Cybele.Thinfinity.UploadEndArgs ):
MESSAGE "Uploaded file:" e:Filename VIEW-AS ALERT-BOX INFORMATION BUTTONS OK TITLE "UploadEnd".
END METHOD.
Running on Server
To run the demos on VirtualUI Server, create the application profiles with the following parameters (check paths):
VirtualUI_dotNET app:
- Program path: C:\Progress\OpenEdge\bin\prowin.exe
- Arguments: -p wWin.r -nosplash
- Start in folder: C:\OpenEdge\VirtualUI\VirtualUI_dotNET
VirtualUI_AppBuilder app:
- Program path: C:\Progress\OpenEdge\bin\prowin.exe
- Arguments: -p RunForm1.r -nosplash
- Start in folder: C:\OpenEdge\VirtualUI\VirtualUI_AppBuilder
On production machines, the parameter -rr must be added to the arguments. If you have developer licenses, this parameter is not supported, and the Procedure Editor is shown after the main application form closes (see https://knowledgebase.progress.com/articles/Article/P20788 for more information).
Running on dev mode
To run in dev mode, under Progress Developer Studio:
1. Start VirtualUI Development Server.
2. Access http://127.0.0.1:6080 on the web browser.
3. Uncomment the lines included in the demos source files:
/* To run in dev mode, under Progress Developer Studio, uncomment these lines:*//*VirtualUI:Enabled = TRUE.
VirtualUI:DevMode = TRUE.
VirtualUI:DevServer:Enabled = TRUE.*/
4. Run application from Progress Developer Studio. The application will run on a desktop and on a web browser.